What Tools Do You Need for Soldering Electronics?

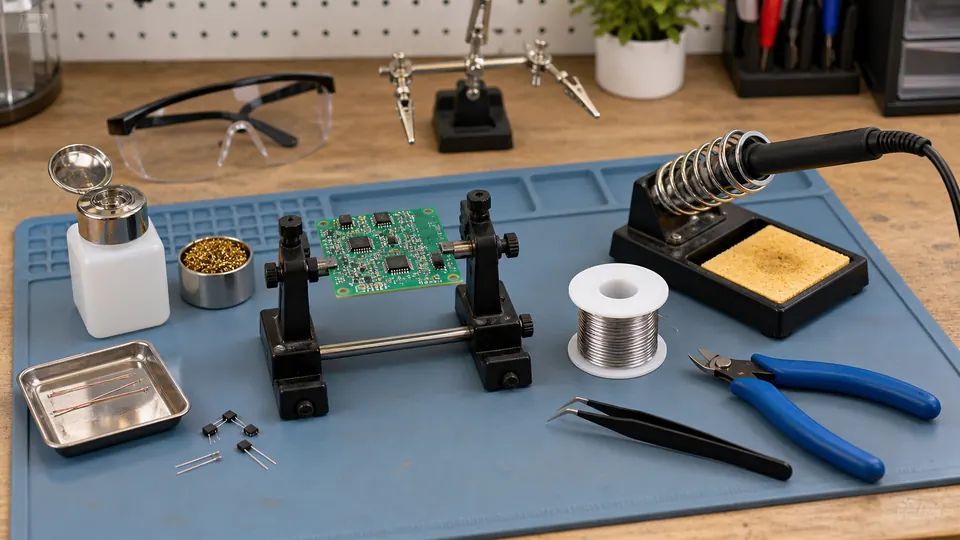
What tools do you need for soldering electronics? A practical basic kit consists of a temperature-controlled soldering iron or station, a compatible tip, an iron stand, electronics-grade solder, suitable flux, tip-cleaning supplies, flush cutters, small pliers or tweezers, eye protection, and a way to control flux fumes. A multimeter and desoldering tools make assembly, inspection, and correction much easier.
The exact kit depends on the work. Through-hole circuit boards require fewer specialized tools than fine-pitch surface-mount assembly, while cable repairs call for wire preparation and strain-relief supplies. Buying every possible accessory at the start is unnecessary. Begin with equipment that supports safe heating, clean joints, basic inspection, and correction of mistakes.
The core soldering kit
| Tool or material | Purpose | What matters most |
|---|---|---|
| Soldering iron or station | Heats the joint and melts solder | Temperature control, stable performance, comfortable handpiece, and available replacement tips |
| Soldering tip | Transfers heat from the iron to the work | Correct tip family, useful contact area, suitable geometry, and access to the joint |
| Iron stand | Holds the hot iron safely between joints | Stability, secure handpiece support, and heat-resistant construction |
| Electronics solder | Forms the electrical and metallurgical connection | Suitable alloy, appropriate diameter, and compatible flux core |
| Additional flux | Promotes wetting and helps remove surface oxides during heating | Flux chemistry that suits the soldering process and cleaning plan |
| Tip cleaner | Removes oxidation and excess solder from the tip | Brass wool or a damp sponge used without aggressive abrasion |
| Flush cutters | Trims component leads and small wire | Clean cutting action and a size suitable for electronics |
| Tweezers or small pliers | Positions components and forms leads | Fine control without crushing components or damaging insulation |
| Fume control | Moves flux fumes away from the breathing zone | Effective placement and a ventilation method appropriate for the workspace |
| Eye protection | Helps protect against clipped leads, solder droplets, and flux spatter | Comfortable safety glasses that remain on during work |
Temperature-controlled soldering iron or station
A basic plug-in iron can melt solder, but a temperature-controlled iron or station is more useful for electronics. Regulation helps the tip recover as heat flows into a joint and allows adjustment for different solder alloys, board construction, connector sizes, and component sensitivities.
Nominal wattage does not reveal the whole thermal performance of an iron. Heater design, sensor placement, control behavior, tip construction, and the thermal demand of the joint all affect how the tool performs. A very high maximum temperature is also a poor substitute for efficient heat transfer.
Useful practical features include:
- A comfortable, lightweight handpiece
- A flexible, heat-resistant cord
- Readily available compatible replacement tips
- A stable stand
- Clear temperature adjustment
- Automatic sleep or shutdown features, where available
For occasional circuit-board assembly, one reliable iron is usually enough. Production work, frequent repairs, large connectors, or mixed through-hole and surface-mount jobs may justify equipment with faster thermal recovery or interchangeable handpieces.
Tips matched to the joint
The smallest available tip is rarely the default choice for small electronics. A needle-like tip may touch only a tiny part of the pad or lead, reducing heat transfer and encouraging the operator to increase the setting or hold the iron in place longer.
A small chisel tip is a versatile starting choice for many through-hole joints and common surface-mount parts. Its flat edge can contact both the component lead and copper pad. Conical, bevel, hoof, and larger chisel shapes have useful applications as well. Selection depends on joint geometry, available access, nearby components, and thermal mass.
Replacement tips must fit the specific iron or handpiece. Similar-looking tips are not necessarily electrically, mechanically, or thermally compatible. Check the equipment documentation before purchasing another shape or size.
Solder and flux
Solder is a consumable rather than a hand tool, but no electronics kit works without it. Choose solder intended for electrical or electronic assembly. Plumbing solder and aggressive plumbing flux can damage electronic assemblies and should not be used on circuit boards.
Both lead-containing and lead-free electronic solders are commonly encountered. They differ in handling, process temperature, wetting behavior, and hygiene requirements. Select an alloy that suits the assembly, workplace rules, repair requirements, and component or board specifications. Avoid mixing alloys casually during repair when the existing process or manufacturer guidance calls for a particular material.
Wire diameter affects control. Thin solder wire makes it easier to feed a modest amount into small joints. Larger wire can be convenient for connectors, heavy leads, and other joints that consume more solder.
Flux-core solder supplies flux as it melts, yet a separate flux pen, syringe, or bottle remains useful for rework, oxidized surfaces, drag soldering, and desoldering. Flux should be intended for electronics and compatible with the metals, solder alloy, and cleaning process. Residue requirements vary by chemistry. Follow the product instructions rather than assuming every residue must be treated the same way.
Stand and tip-care supplies
A hot iron needs a stable stand within easy reach. Resting it on a bench can burn surfaces, melt cables, or contact nearby materials. Some stations include an integrated holder, while portable irons may require a separate stand.
Brass tip-cleaning wool removes excess solder with little cooling. A damp cellulose sponge can also work, though repeated wiping cools the tip more noticeably. Keep the plated tip lightly tinned during use and before storage. Filing or sanding a plated tip can remove its protective surface and shorten its service life.
Hand tools for component and wire preparation
Flush cutters
Flush cutters trim protruding component leads after soldering and cut small-gauge hookup wire. Hold or shield the cut end because clipped leads can fly from the board. Do not use delicate electronics cutters on hardened steel, screws, or wire beyond their rated capacity.
Needle-nose pliers and tweezers
Small needle-nose pliers help bend leads, hold nuts, and position wires. Fine tweezers provide better control for surface-mount components and short lead sections. ESD-safe tweezers may be appropriate around static-sensitive parts, but the tool is only one part of a complete ESD-control approach.
Wire strippers
Wire strippers are necessary for cable assembly, connector work, and repairs involving insulated conductors. The stripping method should remove insulation without nicking or cutting conductor strands. Adjustable or gauge-specific strippers usually offer better control than stripping with cutters or a knife.
Solder should not carry repeated pulling or flexing loads by itself. Cable ties, clamps, connector housings, heat-shrink tubing, and other strain-relief methods can protect wire terminations where movement is expected.
A board holder or helping fixture
A circuit-board vise or adjustable fixture keeps the assembly stable and leaves both hands free for the iron and solder. Simple helping-hands clips can hold wires, though strong clips may crush insulation or pull small pads if positioned carelessly. Stability matters more than the number of arms or attachments.
Tools for checking the work
Good lighting and magnification
Bright, adjustable lighting makes it easier to see pad coverage, bridges, stray wire strands, damaged insulation, and component markings. A magnifying lamp, head-mounted magnifier, loupe, or inspection microscope becomes increasingly useful as component spacing decreases.
Inspection should focus on wetting, joint shape, cracks, unintended bridges, disturbed solder, lifted pads, and visible gaps. Surface brightness varies with the alloy and process, so a shiny or dull finish by itself is not a dependable quality judgment.
Digital multimeter
A multimeter helps check continuity, resistance, voltage, polarity, and possible shorts. For an unpowered board, continuity checks can confirm that a connection exists where expected and help find accidental bridges. Circuit topology matters because parallel paths may produce a beep or low resistance without indicating a soldering defect.
Visual inspection and electrical testing complement each other. Neither method by itself verifies every mechanical connection, component orientation, circuit value, or operating condition.
Desoldering and rework equipment
Mistakes, damaged components, and excess solder are normal reasons to keep at least one desoldering tool nearby. The appropriate option depends on the joint.
- Desoldering braid: Copper braid treated with flux absorbs molten solder. It is useful for flattening surface-mount pads, removing small bridges, and clearing modest solder deposits.
- Manual solder sucker: A spring-loaded pump removes molten solder from through-holes and larger joints. Good alignment and timing matter.
- Desoldering gun or station: Heated suction equipment is valuable for frequent through-hole rework, especially on connectors and boards with many joints.
- Low-melting rework alloy: Specialized alloys can keep groups of joints molten longer during some removal tasks. Use them according to their instructions and clean the site appropriately before installing replacement parts.
Repeatedly heating a stubborn pad can lift copper, damage plating, loosen vias, or overheat the component. If solder will not clear, stop and check tip contact, flux, tool capacity, joint access, and whether the lead is mechanically trapped before applying more heat or force.
Additional equipment for surface-mount work
Many surface-mount resistors, capacitors, and integrated circuits can be installed with a temperature-controlled iron, suitable tip, flux, fine solder, and tweezers. Smaller packages and closely spaced leads increase the value of magnification and precise dispensing.
Depending on the package and quantity of work, useful additions include:
- A microscope or strong magnifier
- Fine, stable tweezers
- Flux in a controlled applicator
- Solder paste and a suitable dispensing method
- Hot-air rework equipment
- A controlled reflow tool or process
- Heat-resistant tape or shielding for nearby parts, where appropriate
Hot air is useful for multi-leaded packages and component removal, but airflow can move small parts and heat nearby components. Nozzle choice, airflow, board construction, component limits, and heating technique all affect the process. Fine-pitch packages may be better suited to drag soldering, paste and reflow, or other package-appropriate methods than individual point-by-point joints.
Workspace and safety equipment
The working area should be stable, well lit, free from loose flammable materials, and arranged so the iron cord cannot drag across the assembly. Keep the stand close enough that returning the iron becomes an automatic motion.
- Safety glasses: Wear them while soldering, desoldering, and trimming leads.
- Fume extraction or ventilation: Position airflow to move flux fumes away from the face. The effective arrangement depends on the room, process, frequency of work, and materials being heated.
- Heat-resistant work surface: A soldering mat or other suitable surface protects the bench and provides a defined work area.
- Hand-washing access: Wash after handling solder and before eating or touching the face, particularly after working with lead-containing alloys.
- Closed storage: Store solder, flux, chemicals, and sharp tools away from food and where children or pets cannot reach them.
Most visible smoke during hand soldering comes from heated flux and related process materials rather than vaporized lead. That distinction does not remove the need for sensible fume control. Avoid placing the face directly over the joint, and follow applicable product safety information.
ESD control
An ESD mat, grounded wrist strap, and suitable storage may be appropriate for static-sensitive semiconductors, modules, and assemblies. ESD precautions should form a controlled system with correct grounding rather than a collection of isolated accessories. Never connect a wrist strap directly to mains wiring or an improvised ground. Use purpose-made ESD equipment as specified.
Choosing a kit for the work you plan to do
Basic through-hole assembly
For kits, prototype boards, and ordinary through-hole repairs, start with:
- A temperature-controlled iron or station
- A small or medium compatible chisel tip
- A secure stand and tip cleaner
- Electronics-grade solder and compatible flux
- Flush cutters and small pliers
- A board holder
- Eye protection and fume control
- A multimeter
- Desoldering braid or a manual pump
Wire and connector work
Add wire strippers, heat-shrink tubing, a suitable heat source for shrinking it, and proper strain-relief materials. Larger connectors may require a tip with greater contact area and an iron capable of maintaining useful heat transfer into the joint. Raising the temperature excessively can damage connector housings and insulation without solving poor tip contact.
Surface-mount assembly and repair
Add fine tweezers, magnification, controlled flux application, and tips selected for the package geometry. Hot air, solder paste, reflow equipment, or a desoldering station can become worthwhile as package complexity and repair frequency increase.
Occasional household electronics repair
A modest kit can handle broken wires, accessible connectors, switches, and simple circuit-board joints. Repairs involving mains voltage, rechargeable battery packs, safety-critical devices, multilayer board damage, or unfamiliar high-energy circuits require added knowledge and appropriate equipment. Stop if the repair cannot be isolated and tested safely.
What can wait until later
Specialized equipment is easier to choose after the limits of the basic kit become clear. A beginner usually does not need a hot-air station, inspection microscope, powered desoldering gun, preheater, or large collection of tips for the first through-hole project.
Spend initial attention on the iron, a useful compatible tip, safe placement, suitable solder and flux, basic hand tools, inspection, and correction tools. Those items address the main physical needs of electronics soldering: transferring heat efficiently, controlling the materials, holding the work steady, seeing the joint clearly, and fixing errors without unnecessary damage.

- Jesse
Jesse is the editor behind Soldering Gear, where he covers soldering irons, stations, rework equipment, and the tools that belong on a practical electronics bench. His work focuses on comparing product specifications, features, compatibility, and intended uses so readers can make more informed buying decisions.
- Best Soldering Iron for SMD: 9 Picks in 2026 October 15, 2026
- Best Hot Air Rework Station for SMD: 9 Picks in 2026 October 14, 2026
- What Tools Do You Need for Soldering Electronics? October 13, 2026
- Best USB-C Soldering Iron: 9 Picks in 2026 October 12, 2026
- How to Choose Solder for Electronics October 11, 2026